Towel Wedding Gift Cake


A made this "cake" as a gift for one of my best friends from high school who is marrying her high school sweetheart this coming weekend. These are really fun to make and you can be as creative as you would like in what you include as a gift and they look pretty classy too!

What You Need

Wash rags(I used roughly 6 nice ones that fit my color scheme and 20 white ones)
Hand towels(I used 4 bathroom towels and 6 simple kitchen hand towels)
Masking Tape
Round Paper Mache Container
Paint
Fabric
Glue
Candy(or whatever else you want to put into your container)
Ribbon that matches your color scheme
Random Kitchen Utensils
Tulle


1. Start by folding all your wash rags and hand towels and rolling them so that the edges are on the inside and tape with masking tape


Top Layer
1. Use 9 of your white wash rags and stand them up to make a circle. (one in the middle and 8 around)
2. Use ribbon to tie in place


Middle Layer
1. I used 4 white kitchen hand towels in the center and surrounded them by 10 wash rags. 6 were part of the color scheme and the back four were white.
2. Use ribbon to tie together.


Bottom Layer
1. You can either use a paper mache container(see directions below) as a surprise when they untie the cake or you can simply use hand towels(4).
2. Surround the paper mache container with white wash rags(takes about 10)
3. Wrap 2 kitchen hand towels around the wash rags(I tied these around together just to keep everything put together
4. Use your 4 bathroom hand towels that go with your color scheme around the front and then use 8 white wash rags around the back.
5. Tie together


Paper Mache Container
1. Container should be about 5 inches tall and 5 inches across
2. Paint container white(will need a couple of coats)

3. Paint the name of the couple and the day they are getting married onto the container
4. Paint "Happily ever after..." onto the lid

5. Use gold paint to make small designs around the container

6. Measure out a square of fabric that is about 8 inches by 16 inches
7. Sew together the sides

8. Fold top edges over and hot glue to inside edges of the container. 
9. Fill container with goodies


Attaching each layer
1. Use your ribbon to tread through top ribbon loop and down through the cake and tie.(do on back and both sides)
2.  If you want extra support, after you add your kitchen utensils  you can use your ribbon to tie everything together on the outside. Start by cutting two pieces of ribbon that will be long enough to run underneath your cake and all the way up to the top with some extra to tie a bow. Make an X with the middle of the ribbon and place cake on top of it so that the front of the cake is inbetween the two pieces of ribbon. Bring the four sides together at the top and tie into a big bow

Finishing Touches
1. Place different utensils into the cake in various places. You can use tulle at the top where some of the spoons can come out.
2. Place on cutting board to cardboard cake bottom


Paper Mache Letters


These are really fun and simple to make. These make great decor for a child's room.


What you will Need

Paper Mache
Paint
Stencils
Velcro
Gorilla Glue

  1. Start by painting a base color on each letter. It is best to use two coats on each letter
  2. Either free hand or use stencils to make designs on each of the letters. On the girl letters I used kind of a "hippie" theme because that is what she likes and on the boy letters I used sports, planes, cars, and tools.
  3. Once letters all dry use gorilla glue to glue on velcro to bottom of letter and whatever surface the letters are going on.


Strawberry Poke Cake


Strawberry Poke Cake

Ingredients
  • French Vanilla Cake Mix
  • Eggs
  • Oil
  • Strawberry Jello
  • Whipped Cream
  • Sliced frozen strawberries
  • powdered sugar
Directions
  1. Bake cake according to box directions
  2. Before cake gets done prepare jello mixture according to box directions.
  3. After pulling cake out of oven poke holes in the cake. I use a large two prong fork normally.
  4. Poor jello mixture evenly over the cake
  5. Put cake into fridge for at least 10 hours.
  6. Place frozen strawberries in fridge to let them thaw out
  7. Drain strawberries and keep some of the juice. 
  8. Whip together whipped cream and strawberries. Add in a little bit of the juice and whip in powdered sugar until it gets to the sweetness you like
  9. Spread mixture over cake and place cake back in fridge for a couple of hours.
  10. Serve cold and Enjoy!

Balloons of Encouragement


My baby sister graduated from high school this last weekend and so the last month has been very busy getting things together for her. One of the things I was most excited about was what we are now calling her "balloons of encouragement." It was a very easy project, but one she will have forever. I did it for graduation, but I think it would be a great idea for birthdays, anniversaries, and any other special milestone. 

What you will need

Balloons
Card stock
Photos
Letters
Dragon tears
tulle
ribbon
hole punch

1. First, I had people important in her life(grandparents, parents, siblings, aunts, uncles, friends etc) write her letters on one side of the card stock. 
2. On the other side I attached a 4x6 of one of her senior pictures. Originally we were going to do a picture from each year she was in school, but her senior pictures came in right before graduation and they were so good we used those instead.
3. We used the hole punch to punch a hole in the top of each card
4.  Then use tulle to make a small pouch of dragon tears to weight down the balloon and use ribbon to tie it close and attach it to the card stock


5. Finally, tie the balloon through the hole and spread them around tables.(I also used tissue paper centerpieces for decoration.)

Tissue Paper Flowers and Fashion Vases

Tissue paper flowers make a nice centerpiece which is easy to make and won't break the bank. You can make 6 flowers from 8 sheets of standard tissue paper. I made these for my sister's graduation party and they were a big hit!

Things you will need

Tissue Paper(4 sheets of standard tissue paper makes 3 flowers)
Floral Wire
Scissors
Wooden Sticks
Green Paint
Glue Gun


1. Lay out your four sheets of tissue paper all lined up

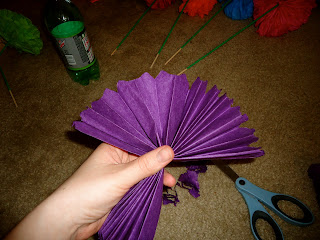
2. Accordion fold tissue paper back and forth with each section being about 1 to 1.5 inches keeping tissue paper as straight as possible

3. Cut tissue paper in 3 fairly equal parts(note: you can cut on section bigger than the other two if you want bigger center flowers)(note #2: if you are using shorter tissue paper like what you get from target just cut 3 inches off the end and cut in half)

4. Cut off about 7 inches of floral wire and wrap around the center of the tissue paper

5. Cut the edges of the tissue paper so that they are half circles

6. Spread out one side of the tissue paper and start to separate the first sheet of tissue paper so that it will cover the center and then do the other side. Continue until all layers are separated.


7. Paint wooden sticks a nice grass green or any other color you would like.

8. Lay flowers out so they are close to the wall and use hot glue gun to glue wooden sticks onto the flowers. I let stick rest against the wall for 10-15 minutes to ensure it is dry and I found gluing it between two layers of the accordion fold keeps it from falling off more.  I used a 90 degree angle for the center flowers and a 45 degree angle for the side flowers. 

Fashion Vases

The vases are very easy and are a fun way to customize your arrangement. I used tall skinny vases but you can really use any kind of vase. All you have to do is use painters tape and tape on your design and then spray paint the vase any color you want. I used green because it was the color of her high school. Give the paint a good half hour to dry. Then remove the tape and insert your flowers. 


Contributors