DIY Canvas Totes

I made these for my two little sisters who like me are slaving away at college. I thought it would be something nice they would like, but would also be practical. Every year I get them the same thing and this year I wanted to do something a little more special. I made both of these in about 5 hours so they don't take very long to make and they really are a pretty inexpensive gift. Enjoy!


What You Need
1 yard canvas
coordinating thread
pins
Straps
iron
1 1/2 yards of webbing for straps

1. Start by measuring out a piece that is 22 inches across by 11 inches long

2. Use pin where you want your ruffled seams as shown


3. Iron down your seams
4. Sew in your ruffle and cut bottoms to round them


5. Cut out two pieces that are 13 inches by 5 inches and two pieces that are 6 inches by 13 inches
6. Sew together the 13x5 inches piece to the 13x6 inch piece and repeat

7. Using your ruffled piece as a template cut out a piece that is the exact size of your ruffled piece

8. Sew one of your pieces from above to your ruffled piece with the smaller of the two pieces being in the middle and sew the other piece to the back you just cut out

9. Pin with the outside of the bag facing inward and sew these two pieces together

10. Fold down top piece one inch and then fold down again and sew around

Straps
1. Cut your webbing in half.
2. Sew your straps on using the inner inch of fabric so you won't have lines on the outside

3. Sew small line of strap to the front to keep inside fabric from being pulled up


Bow(optional)
1. Cut out a piece that is 22x9in
2. Sew close two sides so that you are making kind of a closed sleeve and turn inside out


3. Sew together your ends so that you are making a large circle

4. Cut out a piece of fabric that is 10x3.5 inches and sew into a sleeve as above and then sew together the two ends. Now you should have one small circle and one large circle

5. Push your bigger circle of fabric through your smaller circle and secure to your bag with thread.


Merry Christmas!

So I may have ran out of time to get all of my crafts done before Christmas. Some things got put on hold and some things simply didn't turn out, but all in all it was a wonderful, beautiful, fast, and furious Christmas. In 2013, there is so much to look forward to. I already have a number of projects I can't wait to start. I will also be working hard to get ready for my board exams. I am also excited to announce my sister will start making guest appearances on my blog in the upcoming year. As a mother, social worker, and wife, she is often working on projects that I find extremely inspiring. We will also be working on more group projects in 2013. I hope you all had a very Merry Christmas and are as excited about the new year as I am. There is nothing like new beginnings.

5am Christmas Morning

First gifts opened of the day


Santa came to visit


This year we gave them invitations for Christmas. Check back for all the details.


Pampering in a Jar

I have been very excited about this project ever since I decided to do a hand-made Christmas. There are tons of different options to put in this jar and is customizable for anyone. I made one for each of the adult women in my life: grandmas, mom, sisters, friends. I think my favorite part was making everything that was going to go in the jar and shopping for the little things I wasn't going to make.  I used pipe cleaners for the letters and glued them on and used cupcake liners for the top of the lids. I did stickers to label what each jar was for. "Pamper Jar" "Refreshment Jar" "College Survival Jar" "Beauty Jar"


Components of the Pamper Jar
Home-made Body Scrub
Foot scrub
Home-made soap
Lotion
Chapstick
Face Mask
File
Fuzzy socks
Soaking Bath Salts
Chocolate
Spray
Bubble Bath
Bath Oils
Candles
Ear plugs
Fingernail Polish

Components of a Refreshment Jar
Gum
lint roller
tic-tacs
stain remover
mini-tooth brush on the go kind of things
sanitizer
mini-deodorant
small bottle of perfume


Components of a College Survival Jar
Pens
Highlighters
Pencils
Post-its
Tabs
Gum
Energy Bars
Chocolate
Paper clips
Mini-notebooks
mini-reading light
Dry Erase markers
Tide pen
Lotion

Quilting

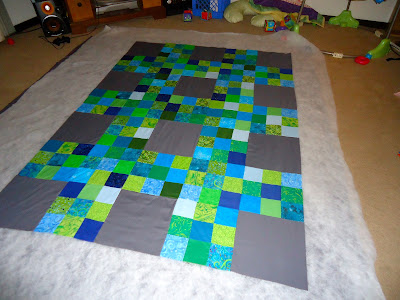
If anyone has an 18 year old brother or son you can completely understand the dilemma I faced this year for Christmas with my brother. What do you get them? They buy the video games they want at midnight premieres because they simply can't fall behind their friends, buying clothes for them is a nightmare because they are 7 foot tall and like thing you would never even imagine buying, and basically they now buy whatever they want when they want. He has always been the hardest to buy for and I really like to get everyone something they really want. He is especially difficult, because his birthday falls not to long before Christmas so I have to think of two different things in a short amount of time. This year I asked him what he wanted for his birthday and he sent me back "idk" which I then had to look up to find the meaning of. My response was various suggestions and his response was "surprise me." I was sure it would be a tough year. He got money for his birthday. To my surprise, however, when I asked him about Christmas his answer was a quilt. A quilt? really? Okay I can do that. So my sister and I got together and debated over different ideas and decided on the quilt below. I did forget to get a picture of all of us together and a good quilt of the final project due to time, but I will post some later under my Christmas post at the end of the month!

 The original pattern is Oh, Fransson! and we loved it instantly. We did make some minor adjustments. We made the squares bigger to make the quilt bigger. So the small squares we did 4x4 instead of 3x3 making the big squares 11x11. We did not do the blocking on the back as I was not a big fan(I really prefer a solid backing.) We used the left over blue and green fabrics for the binding. We did not do the fancy quilting, but instead followed the blocks(we both have simple sewing machines.) Needless to say, this is pretty much my favorite project I have done so far. I just love how it turned out and he seemed to really like it too. I offered to take it back and give him money instead and he was not interested.

Garland and Ornament Clusters

Though my intentions were to decorate early and have a gorgeous house full of glitter and lights it is obviously mid-December and I am just now finishing up with my decorations. Life most definitely keeps me busy. This is my latest project. I wrapped garland around the hand rail of the stair case and then of course added lots of decor. I went with red here since I did blue on the tree.


What You Need
Garland
lights(mine came pre-lit)
Ribbon
ornaments

1. Start by wrapping your garland around your railing and secure
2. String with lights

Ornament clusters(These are super easy to make!)
1. Cut ribbon that is 20 inches long 
2. String with around 8 ornaments close together in the middle 
3. Tie a knot pulling the ornaments together in a cluster
4. Use your remaining ribbon to tie around your rail and garland


Finishing up
1. I then used other ornaments that clipped and hung to decorate the rest of the garland
2. I also used some stuff from the floral section and stuck it in the garland

Contributors