The Main Course


The whole night was centered around italian cuisine and of course our grandparents. We had the cheese fondue, stuffed mushrooms, a vinaigrette salad(which I will share later this week)...all working up to the main course, Chicken Parmesan. My sister was the chef behind this meal and used the Pioneer Woman's recipe. We started it a little before the fondue came out of the oven to give it plenty of time to cook. We did wait 10-15 minutes between when they were done eating each course for them to relax and talk before we served them the next course so the timing worked out perfectly! We served Moscato and Riesling wine with the meal which complimented it well!


Cheese Fondue Dip

Who doesn't love cheese and bread? This was inspired by the fondue dip at Olive Garden and turned out really well. Super easy to make, fast, and tastes like it took lots of time and effort. Plus it warms up very well!

What You Need
French bread(warmed)
Bag of Mozzarella and Provolone smoked shredded cheese mix
1 c sour cream(regular not low fat)
Dash of cayenne pepper
2 tbsp shredded parmesan 

1. Combine cheese, sour cream, cayenne pepper together and spread into bottom of casserole dish
2. Preheat oven to 450 degrees F
3. Bake for 10 minutes
4. Serve with warm bread and tomatoes

Note: pictures to come later

Dinner: The Set-up

Step one was the set the mood and put it all together. We wanted it to look official, feel private, and be extravagant. We started by picking a dress code. As the chefs, Jamie and I wore black pants and black tops with aprons and as the waiters Mike and Ryan wore black pants, a button up black shirt, and green bow-ties with towels over their arm. 

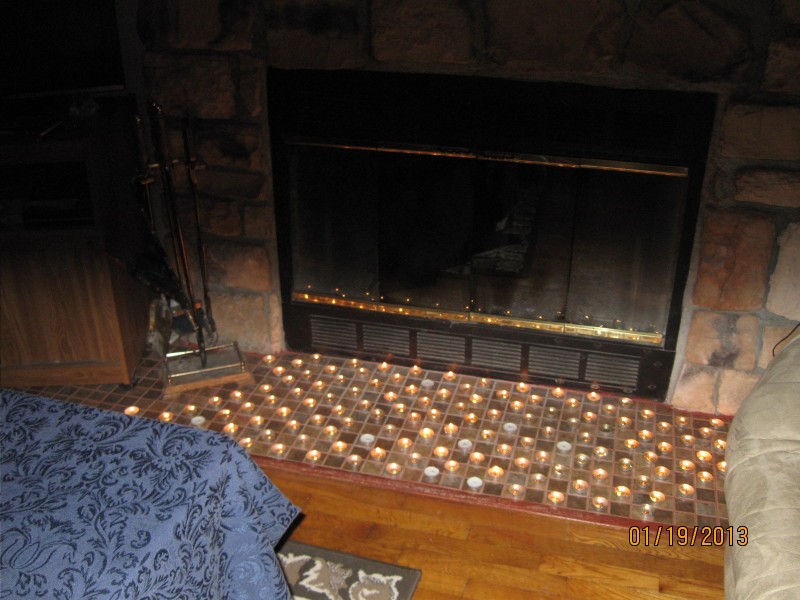
Next was the set up. We moved the living room around so that the center of the room held a card table covered by a nice table cloth. We step up the table to hold cloth napkins, nice wine glasses, and a couple of candles. In fact the entire room was lit only by candles(that mood bit.) We spent a long time lighting 175 tea light candles which were placed in front of the fire place and then separated the rooms with sheets. Thinking back on the sheet ideas, if we had been thinking about it earlier on we would have made a couple of curtains to divide the kitchen from the living room, but the sheets did the job anyways.
We then started the Frank Sinatra and waited for our grandparents to return. We sent them off to get pedicures while we set up giving us about an hour to get everything put together and dinner started.

When they arrived home, Mike and Ryan were waiting on the porch ready to escort them in. Jamie and I parted the sheets as they were escorted to their seats and we started simply with some wine. Mike was grandpa's personal waiter and Ryan was grandma's personal waiter. They got a lesson in pouring wine and the night began. I must mention that we chose the words for the evening with great care. We of course pretended we didn't know them at all and the boys did their best impression of uptown citizens. 


The Story


A few weekends back, my sister, brother in law, brother,  and I put on a big 5 star dinner for two very important people in our lives, our grandparents. Since my sister and I started working 6-7 years ago, we have always tried to do something big for our grandparents for Christmas. This is pretty difficult to do considering they really have about everything they could possibly want and if they don't it is out of our price range. However, we always manage to surprise them anyways. We have gotten them tickets to lots of different things, photo books, and various wines(they love wine.) This year we struggled to find the right gift. My sister and her husband ran into kind of a financial crisis right before Christmas and I was facing my own financial difficulties. It looked like it was going to be a year where they were going to get wine and coffee for Christmas, which I am sure they would have loved. My sister, however, came up with this brilliant idea of putting on a big meal for them with their own personal waiters, us cooking, romantic music, and a night about them. We would put off the expense for a month giving us both time to recoup from our difficult financial situations in December, but also giving them a wonderful gift. The idea wasn't a random one really, it was a memory from the past.
When my sister and I were young, we spent our summers together at our grandparents. We were pretty well known at the local attractions and my grandparents kept us very busy. They both worked during the day, but in the morning we would get up and go to some kind of class and in the afternoon my grandpa would pick us up, we would have lunch, and he would take us to one of the museums, the courthouse, the pool, the library, or whatever he had planned for the day and drop us off to wonder. Almost 10 years ago now, we took a cooking class and our grandparents encouraged us to be over zealous and express ourselves and so we did. That summer we made them dinner with some minor help in our chef hats and our aprons and they loved it. This dinner was a perfect opportunity to bring back a memory from the past and serve a little more sophisticated meal.
It was crazy how successful the night went. It was seamless and our grandparents were great about it. As my brother escorted the two of them two their seats, he told them Frank Sinatra was present tonight for a special live performance for just the two of them. My grandma laughed and said, "that is a special performance, all the way back from the grave." They asked where the bathrooms were(we did this in their own home) and allowed my brother and brother in law to escort them by candlelight. They even told us about their grandchildren. It was an amazing evening and definitely one we will be repeating. In the next few days I will be posting recipes and information on the set up so you can repeat the experience for someone special to you.


Signage

Lately I have felt the need to make the place I rent feel more like my home for the next couple of years. I have a craft room, an office, and my bedroom upstairs and then a large living room and large kitchen downstairs. Once the Christmas decorations came down, it looked pretty bare. So I thought why not add some signs to denote which room is which. I am terrible at painting things free hand or even painting in traced lines. So I did my signs just a little differently.


What You Need
Wood
Paint
Stickers/Decal

1. Start by painting your wood where you letters will be in the color you want your letters.


2. Place stickers on top of paint.

3. Paint over stickers the color you want your sign to be

4. Let dry for 30-60 minutes
5. Peel off stickers

6. Touch up as needed
7. Hang

See super easy! Would be a great projects for kids to do to make signs for their own room and the results look professional.

Behind the Scenes

For the most part I just blog about one of the most exciting parts of my life, my creations and then some small tidbits on the story surrounding what I made. I thought I would take some time and tell you about the person behind the scenes, where I came from, and how this all started.

I'm your typical 20 something lady, in the way that I am completely not typical at all. My life is hectic, amazing, and a mess. I have an incredible family that you would need a diagram to understand. I love to work and I love to create things. I have tons of guilty pleasures and other things I love that I am not as embarrassed to admit. I have dedicated my life to the people I love and to my passion for medicine. I was 8 years old when I decided I wanted to be a doctor. No one in my family had gone to college rather than graduate school, but I was never concerned with the barriers. I was accepted to an accelerated 6 year program where you get a bachelors degree and medical degree simultaneously right out of high school. Let's just say life hit me in the face and all of the sudden I wasn't the smartest, hardest working person in the room. I was in a room full of the best of the best. I was 19 when I failed for the first time. Biochemistry and I just were not a match made in heaven. Or maybe it was that my life seemed to be falling apart at the seams and I couldn't focus. I remember my biggest fear was calling my grandparents to tell them that I would have to take another year and that I had failed. You see they have cosigned all of my loans and here I was a failure. Bless my grandpa's heart, all he said was "failure builds strength, maturity, and character." They weren't mad, they actually seemed to be happy that I failed. They saw it as a stepping stone, something I needed to experience and overcome. Two months after my failure I hit rock bottom. I questioned everything about my life. Who I was, why I chose this path, where I was headed. Life had already not worked out the way I had planned. But over time and with the help of therapy(which I highly recommend for absolutely everyone), I rebuilt from rock bottom. It is from this experience that I believe everyone has the ability to start over and that one should always remember that everyone is fighting some kind of battle.

When in comes to love, I have definitely had my share of love and lost.  I've been looking for the one man I wanted to spend the rest of my life with since I started dating. I have always been one to just go for what I wanted and dive in quickly. I have created some wonderful memories, but not a bond made for marriage. I have learned a few things over the last few years though that I hope I remember the next time I find myself falling hard.

1. Family is super important. If you don't like their family or they don't like yours or their family doesn't like you or vise versa you are in for a rough road and it probably won't work out. 
2. Find someone who can be with your friends and family without needing you to hold their hand. If they can't have a good time with the people you love if you aren't around they may not be what you need.
3. Find someone who makes you feel beautiful even when you are in sweats with no makeup on. It is easy for someone to tell you that you are beautiful, it is harder for them to make you feel beautiful.
4. Never compromise who you are to be with someone. In the end you both end of miserable. 
5. Take your time and give yourself options. 
6. Be happy with who you are first. No one can make you love yourself. That is something you have to learn to do on your own. 
7. Be with someone who is willing to fight for you and is excited to see you. Someone who is looking to share their life with you, not just someone who is willing include you in their life.
8. Opposites attract is only true for magnets. The things you love about them that makes them so different from you are the things you will not like later.
9. Lastly, the person you chose to spend your life with will help determine how happy you are. They will be your support system or the person you knocks you down. So don't settle and don't sell yourself short.

So with all the lessons learned, I am totally clueless on what I am looking for in my future husband, so my love life is non-existant right now and for the first time in my life I'm okay with that. I am taking time to focus on who I am, what I love, and studying for my board exams. When boards are over, I will revisit the idea of what I want from a relationship.


So... how did this all start???? Some of you may think that I am probably totally artistic and have always been very crafty. This however is completely untrue. I can't draw to save my life. I use to think I was completely uncreative and hated working on projects. I didn't even know there was a store named JoAnns(which I spend half of my life in now.) So what changed? I did. My life started to change. I was expecting my first niece, I was in love, I had a place of my own and so many ideas. I started with quilting. I was going to make a baby quilt. I never finished it. But, it was the beginning. I then made bows for my niece(she still doesn't have enough hair to wear them.) Then quilts, then painting, and then my most popular post, the birthday signs. I rarely make things for myself though I do occasionally. Mostly I make things for the people who make my life wonderful and I enjoy watching their reactions to the things I make. Homemade gifts are one of a kind and no one else in the world can give them what you created. It was after finishing my first couple of big projects that I started blogging. I wanted to share my ideas and excitement with other people who loved to create things or wanted to learn to. I figure if someone like me could make it, then anyone can make it!  I get extremely, EXTREMELY excited about my crafts. In a way that is incredibly difficult to show in a blog post. I can stay up all night working on a project and I keep a notebook devoted to keeping track of my ideas(though I am constantly changing my mind.) I blog to share this excitement with the rest of the world so they can create that excitement for themselves. I love seeing other people's creations and the ideas they get from my ideas. 

So there it is. This is me in a nutshell. 

Settling In

So I must say I am in love with my new cricut and it's vinyl cutting abilities. Though you can always cut vinyl by tracing out what you want onto your vinyl and cutting it with a blade, the cricut makes it so much faster and easier. I am still learning how to use it and playing with it almost daily. I decided on doing this little project to test out its vinyl capabilities and I loved the results. As someone who rents a house, I have very limited options on what I can do to decorate, but vinyl is removable. Starting to decorate makes this place feel a little more like home. I used two different fonts for the outside and inside and it has been a couple of weeks and the vinyl is sticking well both on the inside and outside.(we have even had some rain and some snow)


What You Need
Cricut or blade and stencil
Vinyl(you can find this at most craft stores or try vinyloutlet.net)
Transfer paper

Basically you cut out your vinyl and place it the way you want it. Stick your transfer paper to your vinyl and remove the sheet on the back of the vinyl. Stick on clean surface.
Use a craft stick to smooth out your vinyl and make sure it sticks well.


Contributors